How to extract a whole folder of invoices at once
Extracting invoices one at a time works, but it is the slow way to do it. If you have a month of supplier invoices sitting in a folder, you can prepare them once, extract them in batches, and download a single spreadsheet at the end. This is the workflow that gets a BAS-quarter pile done in one sitting.
Collect everything into one folder first
The single biggest time saver is boring: get every invoice into one folder before you open Ledgr. Most of the time lost on a batch is not extraction — it is stopping halfway to dig another invoice out of an email thread.
Work through your sources in one pass:
- Email attachments for the period — save them all at once, not as you go
- Supplier portals you download from monthly
- Photos of paper invoices sitting on your phone
- Anything already scanned into a shared drive
Name them so they sort usefully — 2026-08-15 Acme Plumbing.pdf puts the folder in date order on its own, which makes it much easier to reconcile the finished spreadsheet against the originals later.
Fix the files that will not work
Two minutes here saves a batch that fails halfway. Ledgr accepts PDF, JPG, PNG and WEBP — TIFF works too if you drag it in — at up to 10 MB per file.
| What you have | What to do |
|---|---|
| iPhone photos (.HEIC) | Not supported. Either set Settings → Camera → Formats → Most Compatible before you photograph anything, or open the photos on a computer and export them as JPG. |
| Word, Excel, or .eml/.msg emails | Print or export to PDF first. Ledgr reads documents and images, not file wrappers. |
| One PDF holding several invoices | Split it. Ledgr deliberately declines multi-invoice files rather than guessing where one invoice ends and the next begins — quietly merging two suppliers into one row would be worse than the error. |
| A file over 10 MB | Usually a high-resolution scan. Re-scan at 200–300 dpi, or export the PDF at a lower quality — the text stays perfectly readable. |
| A ZIP of invoices | Extract it to a normal folder first. |
| Photos of paper invoices | Flat, square-on, whole invoice in frame, no shadow across the totals. A crooked photo is the most common cause of a missed GST line. |
Rule of thumb: one invoice per file, and every file opens correctly when you double-click it. If you cannot read it, neither can the extractor.
Split the folder into batches
“All of them at once” has a ceiling, and it depends on your plan. Batching is what keeps extraction quick and predictable rather than queueing a hundred files behind each other.
| Plan | Files per batch | Extractions | Saved history |
|---|---|---|---|
| Free | 1 | 3 per day | None |
| Starter | 5 | 200 per month | 30 days |
| Pro | 15 | 2,000 per month | 60 days |
If you have 40 invoices and a Pro plan, that is three batches. The easiest way to keep your place is to sort the folder by name and work top to bottom, moving each finished batch into adone subfolder as you go — you never have to remember where you were.
Drop the batch in and extract once
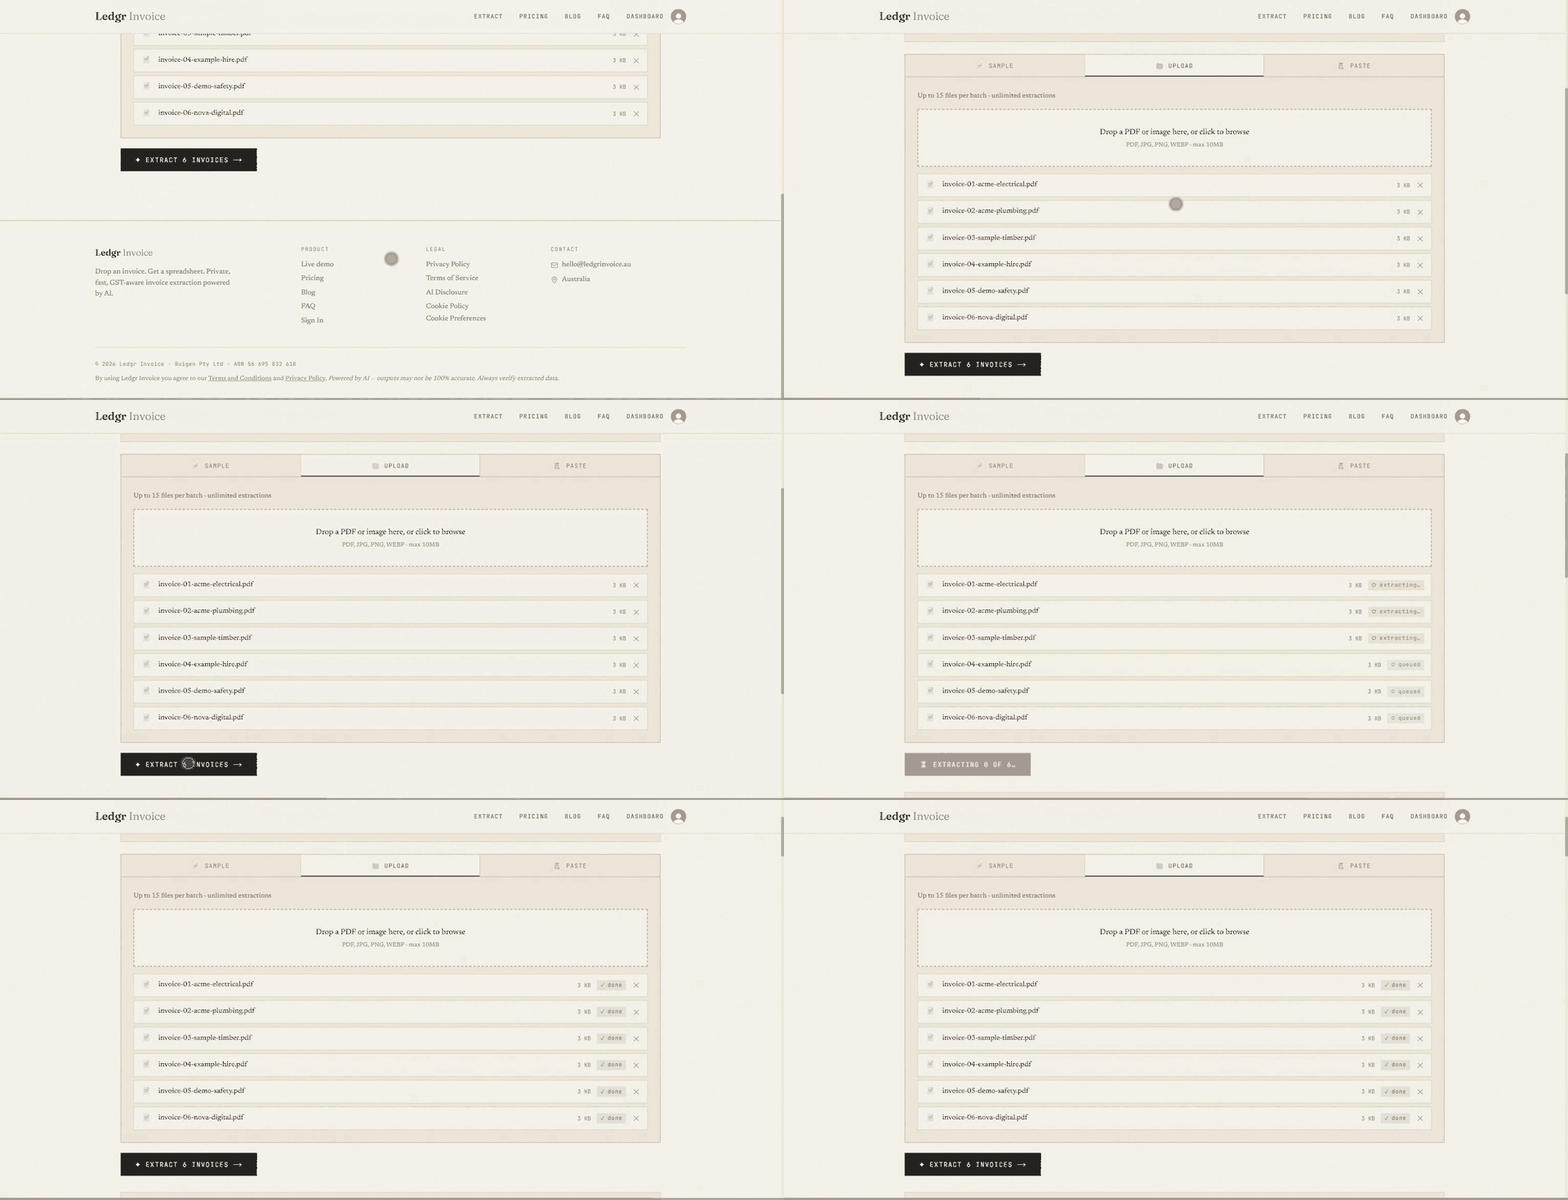
On the extractor page, choose Upload, then select the whole batch — Ctrl+click for individual files,Shift+click for a run of them, or just drag the selection onto the upload area. Then press Extract once. Every file in the batch goes from that single click; there is no per-file button to press.
On Pro, three files are processed concurrently, so a full 15-file batch runs as five rounds rather than fifteen. Each file shows its own status as it moves through the queue, and one failure does not stop the rest of the batch — you can re-run that file on its own afterwards.
Standard or High Accuracy?
Pro accounts can choose the extraction model. Standard is the right default and is noticeably quicker. Switch to High Accuracy when the batch is made up of scans, phone photos, or unusual layouts — the kind of invoices where the numbers are harder to read. Mixing the two is fine: run the clean digital PDFs on Standard, and re-run the awkward ones on High Accuracy.
Download the batch as one file
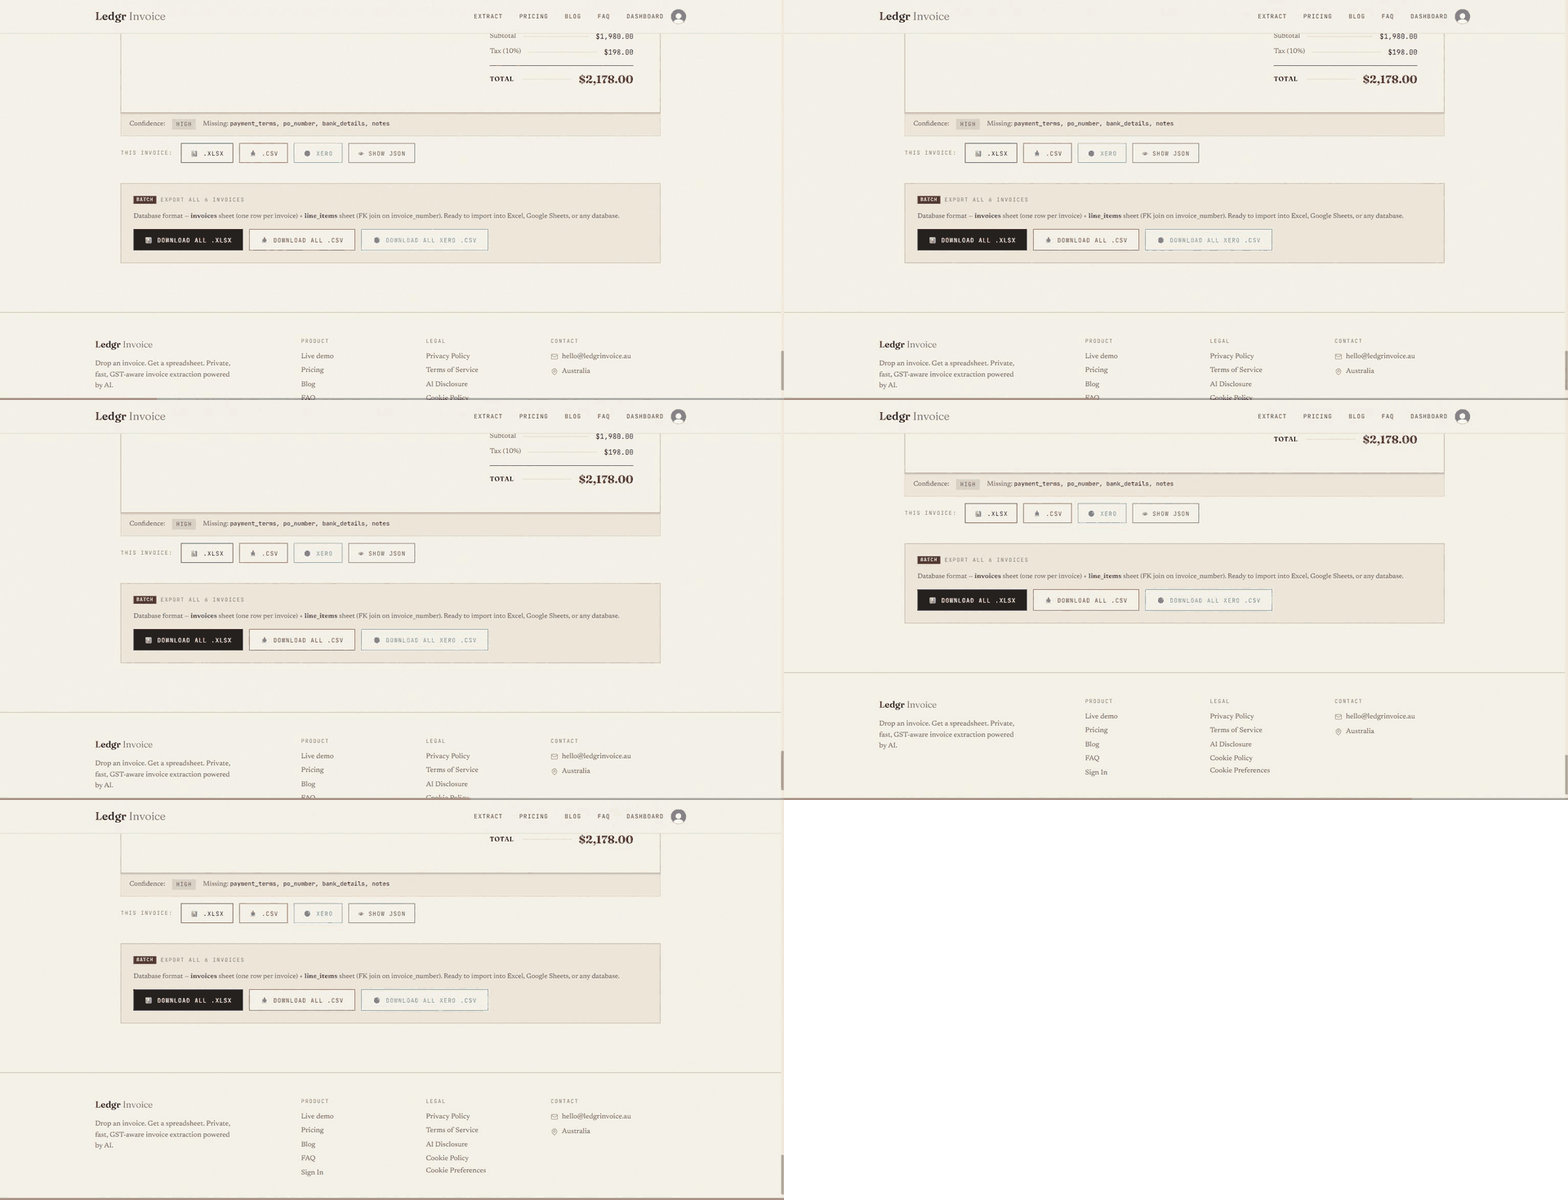
This is where most of the remaining time is won or lost. Once the batch finishes, use the batch download buttons rather than downloading each invoice individually. You get one file containing every successful extraction in the batch, already stacked in rows.
- .xlsx — a workbook with an invoices sheet (one row per invoice) and a line_items sheet keyed on invoice number, so you can pivot on either
- .csv — the same invoice-level rows, with line items held as a single JSON column, for importing into another system
- Xero CSV — formatted for Xero’s bills import; see the next section before you upload it
Check the numbers before you file
Extraction is done by AI, and AI output is not guaranteed to be correct. The point of the batch workflow is to remove the typing, not the checking — and checking a spreadsheet is far faster than typing one.
Scan the finished sheet for four things:
- Totals — sort by total and look at the top and bottom. A misread decimal point stands out immediately in a sorted column.
- GST — where an invoice is fully taxable, GST should be one eleventh of the total. A mixed invoice with GST-free items will not follow that rule, which is exactly why the figure comes from the invoice rather than from a calculation.
- Blank ABNs — usually means the supplier did not print one, which matters for your records.
- Dates — check the issue dates all land inside the period you are working on.
Each extraction also carries a confidence indicator. Treat anything flagged lower as the first place to look, not as the only place to look.
Importing into Xero as bills
Supplier invoices are money you owe, so in Xero they are bills, not sales invoices. The Xero export is built against Xero’s own bills template, column for column — but there are two things you must do yourself before importing, and one thing worth knowing about addresses.
The two columns you have to fill in
*AccountCode and *TaxType are left deliberately blank. Neither can be read off an invoice: the account code depends on your own chart of accounts, and the tax type has to match the tax rate names in your own Xero organisation exactly. Guessing would post your expenses to the wrong accounts or apply the wrong GST treatment — a much more expensive problem than filling in two columns.
- Find your account codes in Xero under Accounting → Chart of accounts. Most people use one or two codes for a whole batch, so you can fill the column down in one action.
- Find your tax rate names under Accounting → Advanced → Tax rates. The text must match what Xero displays, character for character.
Xero works out the tax amount itself from the unit amount and the tax type, which is why the bills template carries no tax column. The GST that was extracted from your invoices is still in the .xlsx and .csv exports — it just has no home in this particular template.
Supplier addresses
The supplier address is exported as one line into POAddressLine1, with the city, state and postcode columns left empty. Splitting a free-text address apart by guesswork writes confidently wrong contact records into your Xero contacts, which is then yours to clean up. One accurate line beats four invented ones.
Running the import
- Download the batch using Xero CSV.
- Open it in Excel, fill *AccountCode and *TaxType down the column, and save it as CSV.
- Do not rename or reorder the column headings, asterisks included — Xero matches on them exactly.
- In Xero, go to Business → Bills to pay and choose Import. (If you cannot see it, search “import bills” in Xero Central — Xero moves this menu occasionally.)
- Import as drafts on your first run, review a few against the original PDFs, then approve.
There is a longer walkthrough of the Xero side in getting invoice data into Xero without manual entry.
Working at higher volume
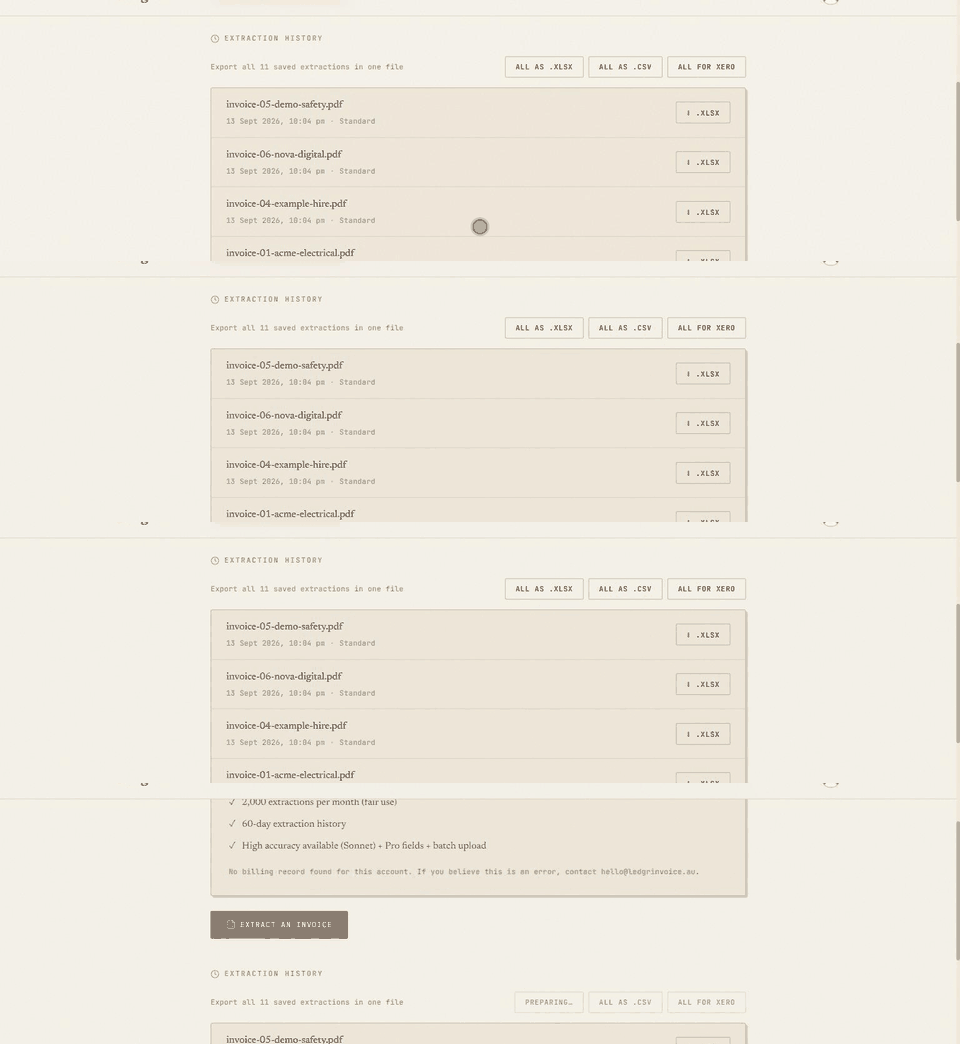
If you are a bookkeeper, or you are working through several months at once, the batches add up faster than you want to manage as separate downloads. Paid plans save every successful extraction for you — 30 days on Starter, 60 days on Pro — and your dashboard can export the whole lot in one file.
On the dashboard, above your extraction history, is Export all saved extractions in one file — as .xlsx, .csv, or Xero CSV. That means you can run batches through the week without downloading anything, then take one combined spreadsheet at the end.
A workable monthly rhythm
- One folder per client per month, filled as invoices arrive
- Prep and batch on a fixed day rather than ad hoc
- Run the batches back to back, downloading nothing
- Export the whole month from the dashboard in one file
- Check, fill the two Xero columns, import as drafts, approve
Worth knowing: what is saved is the extracted data, never the original invoice. Files are processed in memory and are never written to disk or stored on our servers — which is also why an extraction cannot be re-run from history later, only re-downloaded.
When something goes wrong
| What you see | What it means, and what to do |
|---|---|
| A file is rejected before extraction starts | The file is not one of the accepted types, is over 10 MB, or its contents do not match its extension — a common result of renaming a file rather than converting it. Re-export it properly. |
| One file fails, the rest succeed | Normal, and the batch keeps going. Download the successful results first, then re-run the failed file on its own — on High Accuracy if it is a scan or photo. |
| Fields come back blank | Usually the invoice does not state them — plenty of suppliers omit a PO number or a due date. If a field is clearly printed but was missed, re-run that file on High Accuracy. |
| “Limit reached” | You have hit your plan’s allowance — 3 a day on Free, 200 a month on Starter, 2,000 a month on Pro. The message shows when it resets. |
| A history row says “Not available” | That extraction predates saved re-downloads, so there is no stored data behind it. It cannot be recovered — the original file was never kept, by design. Run it again. |
| Xero rejects the import | Nearly always a blank *AccountCode or a *TaxType that does not match one of your tax rate names exactly. Check the heading row is unchanged, too. |
Still stuck? Email hello@ledgrinvoice.au with what you were doing and what you saw — no need to send the invoice.
Got your folder ready? Start with a batch and see how far you get in one sitting.
Extract your first batchPowered by AI — outputs may not be 100% accurate. Always verify extracted data against the original invoice. General information only, not tax, accounting or financial advice.